前言
在分布式架构体系中,离线任务也是主要的功能,之前的公司微服务的架构体系下,离线任务很多,基本都是单实例在跑,且经常出现问题,没有一个合理的监控和报警机制。这次新公司项目中正好有这块的需求,经过调研,采取了xxl-job分布式任务调度框架,在此将相关的功能做做笔记。
一、简介
1.1概述
XXL-JOB是一个分布式任务调度平台,其核心设计目标是开发迅速、学习简单、轻量级、易扩展,基于springboot开发。具体的特性、功能可以参考官方介绍,这里只介绍如何搭建XXL-JOB,SpringBoot项目如何集成XXL-JOB,以及功能的实现逻辑、源码。
1.2架构图

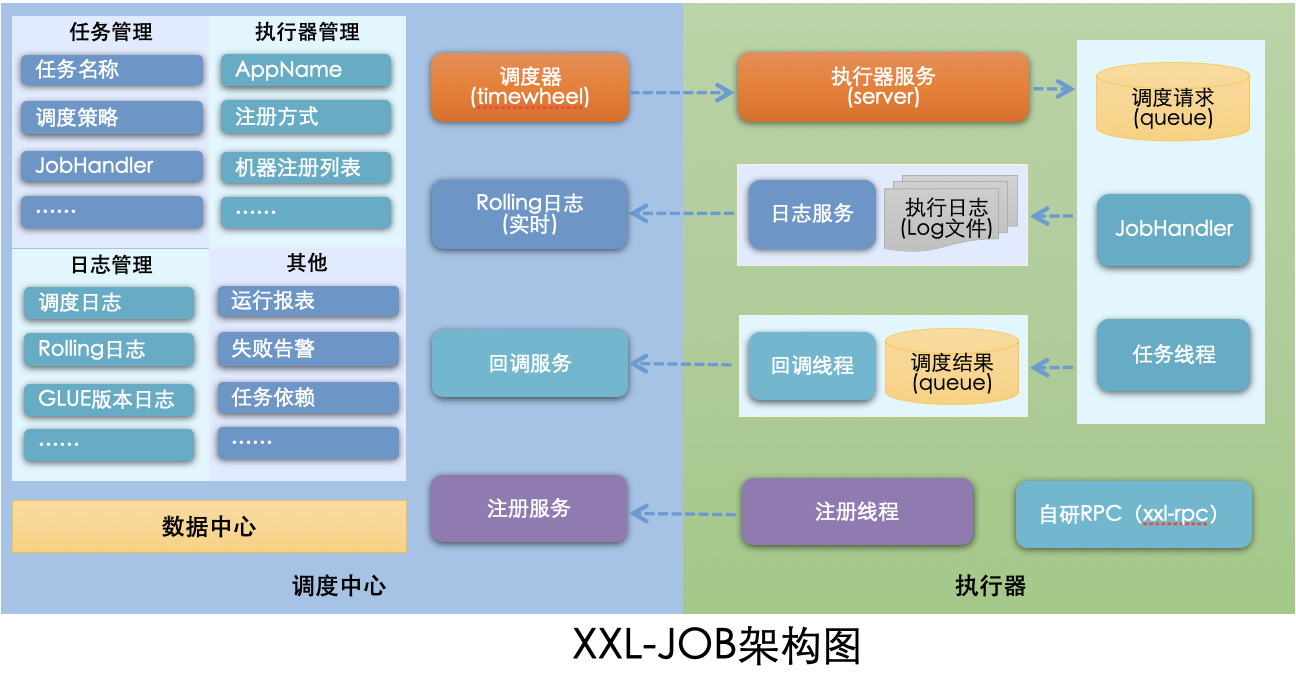
整体系统由调度中心、执行器组成。
将调度行为抽象形成调度中心公共平台,而平台自身并不承担业务逻辑,调度中心负责发起调度请求;
将任务抽象成分散的JobHandler,交给执行器统一管理,执行器负责接收调度请求并执行对应的JobHandler中的业务逻辑。
二、搭建XXL-JOB-ADMIN
2.1 环境准备
xxl-job使用的是mysql存储相关的任务信息,需准备mysql环境。
我这边基于源码安装,也是可以用docker。
git clone https://github.com/xuxueli/xxl-job.git
|
├── LICENSE
├── NOTICE
├── README.md
├── doc #文档,包含数据库脚本
├── pom.xml
├── xxl-job-admin #运维平台
├── xxl-job-core  #核心包,执行器需要的
└── xxl-job-executor-samples # 实例
|
2.1.1 初始化数据库
运行源码doc下面的tables_xxl_job.sql初始化数据库。
xxl-job-group #执行器
xxl-job-info #具体任务的信息
xxl-job-lock #xxl-job分布式任务是通过数据库行锁实现
xxl-job-log #调度日志
xxl-job-log_report #汇总报告
xxl-job-logglue #glue模式日志
xxl-job-registry #执行器注册
xxl-job-user #用户
|
2.1.2 启动
mac用户需要提前创建下logback中的日志目录。
修改 xxl-job-admin 中application.properties mysql配置,运行XxlJobAdminApplication.java 进行启动,访问 http://localhost:8080/xxl-job-admin/ ,登陆用户名密码 admin/123456,需要修改的话,在 xxl-job-user 表中修改,密码是md5的。
三、项目集成 XXL-JOB
3.1 引入pom
<dependency>
		<groupId>com.xuxueli</groupId>
		<artifactId>xxl-job-core</artifactId>
     <version>2.2.0</version>
</dependency>
|
3.2 更改application配置
server.port=8081
xxl.job.admin.addresses=http://127.0.0.1:8080/xxl-job-admin
xxl.job.accessToken=
xxl.job.executor.appname=demo
xxl.job.executor.address=
xxl.job.executor.ip=
xxl.job.executor.port=9999
xxl.job.executor.logpath=/Users/juststand/study/xxl-client/log/jobhandler
xxl.job.executor.logretentiondays=30
|
3.3 创建executor
@Bean
public XxlJobSpringExecutor xxlJobSpringExecutor() {
     XxlJobSpringExecutor executor = new XxlJobSpringExecutor();
     executor.setAccessToken(accessToken);
     executor.setIp(exectorIp);
     executor.setPort(exectorPort);
     executor.setAppname(appname);
     executor.setLogPath(logpath);
     executor.setLogRetentionDays(logretentiondays);
     executor.setAdminAddresses(adminAddress);
     executor.setAddress(executorAddress);
     return executor;
}
|
3.4 创造执行器
@Component
public class DemoJob {

    @XxlJob("demo")
    public ReturnT<String> demo (String param) {
        System.out.println("hello world");
        return ReturnT.SUCCESS;
    }
}
|
3.5 xxl-job-admin中配置
3.5.1 新增执行器
主要是appname,需要填写 执行器代码中配置的appname,如:上文的demo,注册方式由两种:自动注册和手动注册。
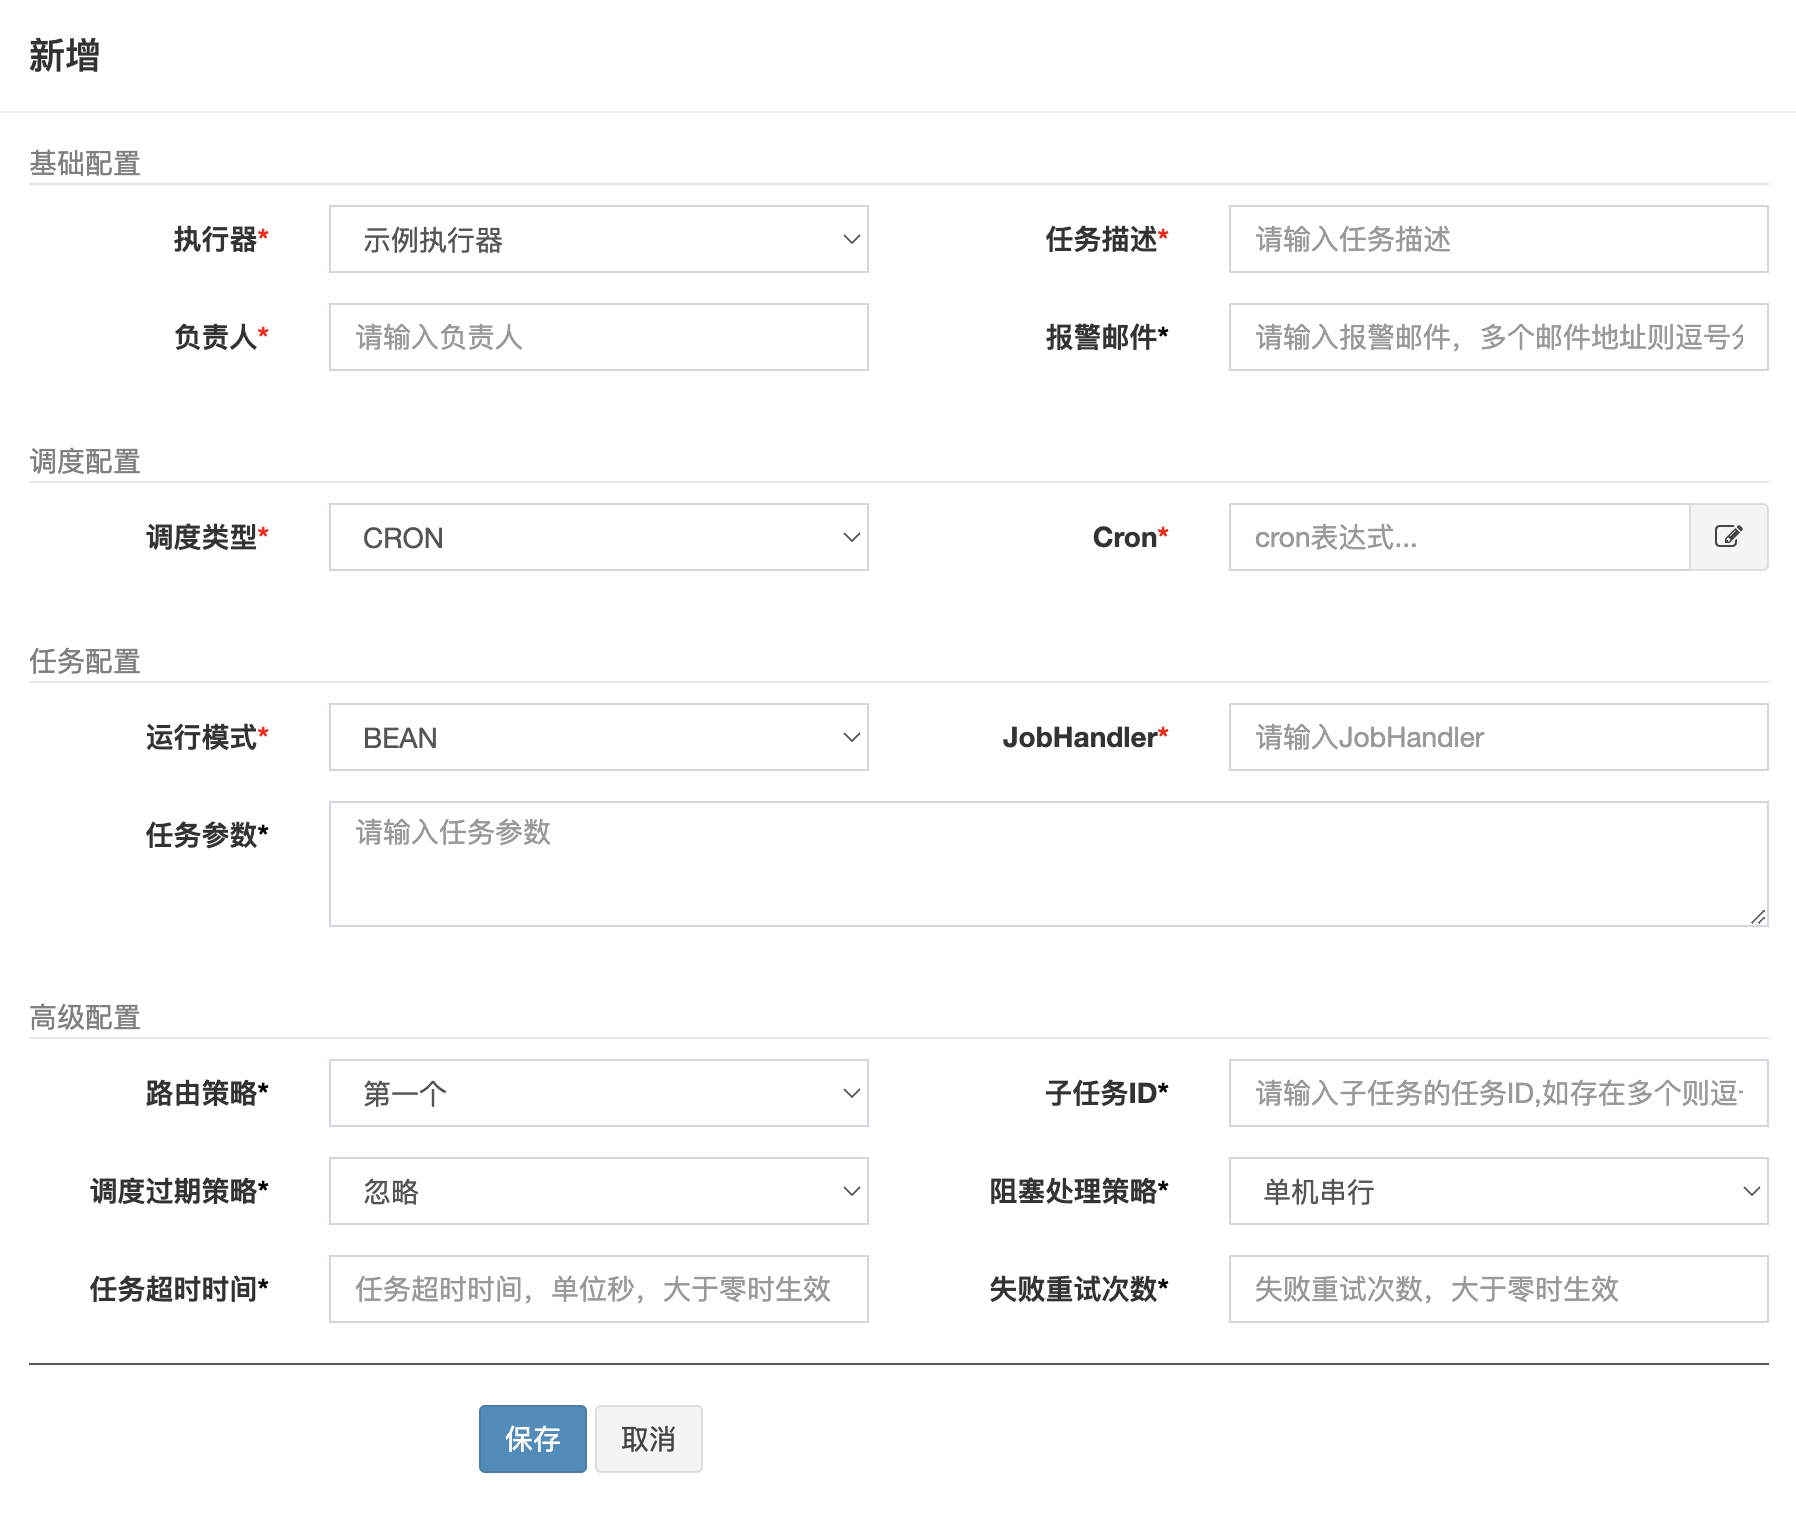
3.5.2 新增任务
选择对应的执行器之后,可以配置相应的任务属性,如:路由策略(多个执行器下)、cron
运行模式、JobHandler(运行模式bean下有效,输入的@XxlJob申明的任务)、阻塞策略、超时时间、重试次数、报警邮箱、任务参数(对应方法的param入参)等。
对应的操作中可以执行一次任务看看,执行完,对应的调度日志中可以看到调用日志。
运行模式有bean、glue两种,glue可以嵌入脚本代码执行,具体的可以看看官方文档。
四、其他功能
4.1 报警机制
任务中配置报警邮箱,以及在xxl-job-admin application 文件中对应的用户名、密码、邮箱服务器,在任务失败的时候会邮箱报警。
任务失败:包括调度失败、执行失败;
调度失败:比如执行器节点宕机
执行失败:比如任务抛出异常、或者返回 ReturnT.FAIL;
五、实现代码
5.1 执行器(以 XxlJobSpringExecutor为例)
XxlJobSpringExecutor 是 XxlJobExecutor 的子类,在初始化XxlJobSpringExecutor 实例的时候,会调用其生命周期函数,完全以下操作。
public void afterSingletonsInstantiated() {
initJobHandlerMethodRepository(applicationContext);
GlueFactory.refreshInstance(1);
try {
super.start();
} catch (Exception e) {
throw new RuntimeException(e);
}
}
public void start() throws Exception {
XxlJobFileAppender.initLogPath(logPath);
initAdminBizList(adminAddresses, accessToken);
JobLogFileCleanThread.getInstance().start(logRetentionDays);
TriggerCallbackThread.getInstance().start();
initEmbedServer(address, ip, port, appname, accessToken);
}
|
5.1.1 加载handler
private void initJobHandlerMethodRepository(ApplicationContext applicationContext) {
if (applicationContext == null) {
return;
}
String[] beanDefinitionNames = applicationContext.getBeanNamesForType(Object.class, false, true);
for (String beanDefinitionName : beanDefinitionNames) {
Object bean = applicationContext.getBean(beanDefinitionName);
Map<Method, XxlJob> annotatedMethods = null;
try {
annotatedMethods = MethodIntrospector.selectMethods(bean.getClass(),
new MethodIntrospector.MetadataLookup<XxlJob>() {
@Override
public XxlJob inspect(Method method) {
return AnnotatedElementUtils.findMergedAnnotation(method, XxlJob.class);
}
});
} catch (Throwable ex) {
logger.error("xxl-job method-jobhandler resolve error for bean[" + beanDefinitionName + "].", ex);
}
for (Map.Entry<Method, XxlJob> methodXxlJobEntry : annotatedMethods.entrySet()) {
registJobHandler(name, new MethodJobHandler(bean, method, initMethod, destroyMethod));
}
}
}
|
5.1.2 callback
任务执行完成,通过调用调度中心 api/callback 接口,上报执行结果。执行器执行完成后,需要TriggerCallbackThread.callBackQueue push 需要callback的内容,callback线程会从callBackQueue.take()获取callback内容,因take是阻塞操作,直到获取到元素。
triggerCallbackThread = new Thread(new Runnable() {
@Override
public void run() {
while(!toStop){
try {
HandleCallbackParam callback = getInstance().callBackQueue.take();
if (callback != null) {
List<HandleCallbackParam> callbackParamList = new ArrayList<HandleCallbackParam>();
int drainToNum = getInstance().callBackQueue.drainTo(callbackParamList);
callbackParamList.add(callback);
if (callbackParamList!=null && callbackParamList.size()>0) {
doCallback(callbackParamList);
}
}
} catch (Exception e) {
if (!toStop) {
logger.error(e.getMessage(), e);
}
}
}
}
});
|
5.1.3 内嵌httpserver
执行器跟调度中心的交互是通过http的方式执行的,执行器通过内嵌httpserver(EmbedServer.java 实现了httpserver)的方式,暴露
/beat、/idleBeat、/run、/kill、/log这些endpoint给调度中心使用。
ServerBootstrap bootstrap = new ServerBootstrap();
bootstrap.group(bossGroup, workerGroup)
.channel(NioServerSocketChannel.class)
.childHandler(new ChannelInitializer<SocketChannel>() {
@Override
public void initChannel(SocketChannel channel) throws Exception {
channel.pipeline()
.addLast(new IdleStateHandler(0, 0, 30 * 3, TimeUnit.SECONDS))
.addLast(new HttpServerCodec())
.addLast(new HttpObjectAggregator(5 * 1024 * 1024))
.addLast(new EmbedHttpServerHandler(executorBiz, accessToken, bizThreadPool));
}
})
.childOption(ChannelOption.SO_KEEPALIVE, true);
|
EmbedHttpServerHandler 实现了endpoint的mapping,具体的实现逻辑在ExecutorBizImpl中。
private Object process(HttpMethod httpMethod, String uri, String requestData, String accessTokenReq) {
try {
if ("/beat".equals(uri)) {
return executorBiz.beat();
} else if ("/idleBeat".equals(uri)) {
IdleBeatParam idleBeatParam = GsonTool.fromJson(requestData, IdleBeatParam.class);
return executorBiz.idleBeat(idleBeatParam);
} else if ("/run".equals(uri)) {
TriggerParam triggerParam = GsonTool.fromJson(requestData, TriggerParam.class);
return executorBiz.run(triggerParam);
} else if ("/kill".equals(uri)) {
KillParam killParam = GsonTool.fromJson(requestData, KillParam.class);
return executorBiz.kill(killParam);
} else if ("/log".equals(uri)) {
LogParam logParam = GsonTool.fromJson(requestData, LogParam.class);
return executorBiz.log(logParam);
} else {
return new ReturnT<String>(ReturnT.FAIL_CODE, "invalid request, uri-mapping("+ uri +") not found.");
}
} catch (Exception e) {
logger.error(e.getMessage(), e);
return new ReturnT<String>(ReturnT.FAIL_CODE, "request error:" + ThrowableUtil.toString(e));
}
}
|
以 /run 为例:
public ReturnT<String> run(TriggerParam triggerParam) {
JobThread jobThread = XxlJobExecutor.loadJobThread(triggerParam.getJobId());
IJobHandler jobHandler = jobThread!=null?jobThread.getHandler():null;
if (jobThread == null) {
jobThread = XxlJobExecutor.registJobThread(triggerParam.getJobId(), jobHandler, removeOldReason);
}
ReturnT<String> pushResult = jobThread.pushTriggerQueue(triggerParam);
return pushResult;
}
|
5.1.4 其他
执行器的核心逻辑其实就是上面三点,如何加载XxlJob handler,如何接受调度请求,如何执行具体的业务逻辑并告诉调度中心结果。另外还有一些日志相关,生成日志,获取日志,清理日志,心跳等。
5.2 调度中心
调度中心的核心逻辑在于通过 XxlJobScheduler 调度线程通过计算任务的执行时间,下一次调用的时间,来触发任务的调度。
5.2.1 任务调度
public void init() throws Exception {
initI18n();
JobRegistryMonitorHelper.getInstance().start();
JobFailMonitorHelper.getInstance().start();
JobLosedMonitorHelper.getInstance().start();
JobTriggerPoolHelper.toStart();
JobLogReportHelper.getInstance().start();
JobScheduleHelper.getInstance().start();
}
|
List<XxlJobInfo> scheduleList = XxlJobAdminConfig.getAdminConfig().getXxlJobInfoDao().scheduleJobQuery(nowTime + PRE_READ_MS, preReadCount);
if (scheduleList!=null && scheduleList.size()>0) {
for (XxlJobInfo jobInfo: scheduleList) {
if (nowTime > jobInfo.getTriggerNextTime() + PRE_READ_MS) {
refreshNextValidTime(jobInfo, new Date());
} else if (nowTime > jobInfo.getTriggerNextTime()) {
JobTriggerPoolHelper.trigger(jobInfo.getId(), TriggerTypeEnum.CRON, -1, null, null, null);
refreshNextValidTime(jobInfo, new Date());
} else {
}
}
} else {
preReadSuc = false;
}
|
5.2.2 endpoint
跟执行器跟调度中心一样,调度中心也暴露了相关http接口提供给执行器使用,/callback、/registry、/registryRemove。这些提供给执行器注册,以及执行器执行完成上报执行结果使用。具体的逻辑由AdminBizImpl 提供。
if ("callback".equals(uri)) {
    List<HandleCallbackParam> callbackParamList = GsonTool.fromJson(data, List.class, HandleCallbackParam.class);
    return adminBiz.callback(callbackParamList);
} else if ("registry".equals(uri)) {
    RegistryParam registryParam = GsonTool.fromJson(data, RegistryParam.class);
    return adminBiz.registry(registryParam);
} else if ("registryRemove".equals(uri)) {
    RegistryParam registryParam = GsonTool.fromJson(data, RegistryParam.class);
    return adminBiz.registryRemove(registryParam);
} else {
    return new ReturnT<String>(ReturnT.FAIL_CODE, "invalid request, uri-mapping("+ uri +") not found.");
}
|
以 /callback 为例:
private ReturnT<String> callback(HandleCallbackParam handleCallbackParam) {
String callbackMsg = null;
if (IJobHandler.SUCCESS.getCode() == handleCallbackParam.getExecuteResult().getCode()) {
}
log.setHandleTime(new Date());
log.setHandleCode(handleCallbackParam.getExecuteResult().getCode());
log.setHandleMsg(handleMsg.toString());
xxlJobLogDao.updateHandleInfo(log);
return ReturnT.SUCCESS;
|
5.2.3 告警机制
Xxl-job-admin默认集成了邮件报警,是通过调度中心来实现的,启动调度中心,会启动告警线程(JobFailMonitorHelper)。
List<Long> failLogIds = XxlJobAdminConfig.getAdminConfig().getXxlJobLogDao().findFailJobLogIds(1000);
if (failLogIds!=null && !failLogIds.isEmpty()) {
for (long failLogId: failLogIds) {
if (log.getExecutorFailRetryCount() > 0) {
}
int newAlarmStatus = 0;
if (info!=null && info.getAlarmEmail()!=null && info.getAlarmEmail().trim().length()>0) {
boolean alarmResult = XxlJobAdminConfig.getAdminConfig().getJobAlarmer().alarm(info, log);
newAlarmStatus = alarmResult?2:3;
} else {
newAlarmStatus = 1;
}
}
}
|
5.2.4 其他
Xxl-Job 提供了可视化的管理界面,其实现是用 FreeMarker 模板编写,集成了用户模块、日志报表等相关功能。整体数据基于mysql存储,任务的执行需进行执行器、jobhandler的配置,springboot开发,整体实现和部署相对容易上手,开箱即用。
六、总结
Xxl-job 整体实现以及使用、部署都相对容易上手,源码很容易读懂,对于需要进行任务监控、重试、告警的离线任务来说,是个不错的选择。整体来说,强依赖mysql、任务中心化管理,针对离线任务不多,分片任务不多的情况下是个不错的选择。